
The Crucial Role of the Fence Post on Equine Properties
Updated:
July 25, 2025By John Ferris, Full Dip. Tech., Prod. Eng.
Often overlooked, the fence post is the backbone of any fencing project and a vital element in agricultural and equestrian settings. It plays a crucial role in managing secure pastures, safeguarding livestock and crops from predators, marking property boundaries, and enhancing land value.
Given its significance, selecting the appropriate post for each job—and ensuring it is installed correctly—is essential. A good guiding principle: when in doubt, size up. Opting for a larger, sturdier post may cost slightly more upfront but will save time, money, and frustration over the long term, while also contributing to a cleaner, more professional-looking result. It’s time to stop treating fence posts as an afterthought and begin handling them with the planning and respect they deserve.
When planning your fence line, ask yourself some key questions: What is the primary function of the post? Will it remain in place year-round, or be removed at season’s end? What type of post works best with your soil type? What level of maintenance are you prepared to commit to? As a general guideline, corner, end, brace, and gate posts should always be at least one foot longer than standard line posts.
A frequent issue I encounter is undersized posts—not deep enough or wide enough to handle the load. If you’re constructing an arena, round pen, paddock, or any other area that will include added footing, remember: the new surface material does not count toward the post’s depth. For instance, if you’re laying six inches of footing, you’ll need a longer post to maintain adequate height. Line posts should be driven a minimum of 2.5 feet into the original soil, while structural posts at corners and gateways require a depth of at least 3.5 feet below the natural ground level.
Related: Barn Safety Tips: Plan Ahead to Improve Your Chances of a Positive Outcome
Related: To Mow or Not to Mow....? Horse Pastures, Paddocks, and Fields
If you are getting an installer or neighbour to do your post pounding, do not be satisfied with anything less than the depths I have recommended, even though you may meet with protest from the person operating the machine.
In some situations the posts will not go into the ground due to rock or severe hardpans. In these cases it is recommended that you rent a pneumatic drill and chip away the substance, keeping the hole as close to the diameter of the post as possible in order that the post maybe locked into the ground.
Do not use small diameter posts in these cases as you are increasing the possibility of having the post snap off at the ground level.
Sometimes, one just has to use a metal post to compensate for the difficulty in installing a wooden post. If this is the case, I recommend a three and a half inch diameter schedule 40 tube. Avoid using the light duty mild steel as this will surely flex. Of course, if the situation allows, it is probably easier to plan the fence away from such difficult areas.
Brace Assemblies

Bracing is an important element of fencing to ensure fence stability and security. Make sure you brace correctly to avoid leveraging the post out of the ground rather than in. Photo: Pam MacKenzie Photography
The importance of large and sturdy posts for the corners, ends, and gateways cannot be overstressed. This also includes the brace post, which is the next or second post in the brace configuration. Braces are an essential part of fence construction and the physics of such brace assemblies have to be correct to do the job. Otherwise, you may end up levering the post out of the ground instead of keeping it in. I cannot emphasize enough the importance of correct bracing.
Diagrams are the best way to explain brace construction so I have set out a few standard BC Ministry of Agriculture engineered braces below with notes to go with them. These diagrams illustrate bracing needed for tensioned wire, polymer, diamond mesh, no climb, farm, and other tensioned products.
Related: Horse Fencing for Special Needs
Related: How to Plan the Best Horse Fence for Your Property
Typical Brace Assemblies & Their Uses

Single Brace Assembly: This is used at the beginning and the end of a straight run, on either side of a gateway, mid-fence line (about every 300 feet) on a long run where an in-line brace is required to add stability to the fence, and where there is undulation in the land or a slight change of direction.

Double Brace Assembly: Used where a single brace assembly is considered insufficient due to length of runs, ground conditions, etc.

Corner Brace Assembly: Used at right angled corners.

Round Corner Brace Assembly: Used where a right angled corner is not desired, i.e. slightly rounded corner.
Detailed Single Brace Assembly
The diagram below shows the materials required to construct a brace. You will notice that I have raised the point of the diagonal wire at the base of the corner post up from the ground approximately 16 to 18 inches. Not only is the injury risk reduced, but from an engineering point of view, the brace is more stable. You will also notice that I have designed a brace in which the diagonal wire can be reduced to a single strand, eliminating the loop at the base of the corner post and top of the next post. The wire is covered by Insul-Tube®, again to lessen the injury risk. This is tensioned with a wire vise tensioning device. This is also very attractive with the white tubing.

DETAILED SINGLE BRACE ASSEMBLY
This diagram shows a ten foot horizontal brace rail; one can go seven feet, eight feet, nine feet, to a maximum of ten feet on a brace span. This horizontal rail should be a solid rail. I am very much against sawn lumber, (e.g. 2”x4”, 2”x6”, etc.) or landscape ties being used for this job. Round is much stronger than square and can absorb the forces of the tensioning far better. Squared or sawn lumber weakens, bows, and often ends up splintering, sometimes into deadly spears. The diagonal wire can be substituted by a rail (not squared lumber) if one does not want to use wire, but wire does a better job of holding those bracing posts in place.
On the subject of wire, make sure those brace wires are high tensile galvanized steel. Low tensile or soft wire is easier to work with but does not do the job adequately — it will slacken and belly over time and often the galvanizing is poorer and rust sets in.
You will notice from the detailed material used in the brace assembly that I use rebar or a large pin to attach the horizontal rail to the brace posts. Pre-drill a three-eighths inch hole in the centre of either end of the rail and into the brace post in order to accommodate the rebar or pin to avoid splitting the wood. Do not toenail (hammer a large nail at an angle through the horizontal rail into the post). These are dangerous areas and the chances of splitting and weakening the wood are very high.
There are various other types of brace configurations for different situations, but the ones I have shown are the most widely used and are suitable for almost all conditions.
Related: Get Your Horse on a Track System
Related: Safe and Functional Horse Fencing

There are several options for bracing a fence. This one has been tensioned by twisting the two wires together. You may prefer to use the Insul-Tube® method or a solid post instead. Photo: Pam MacKenzie Photography
Directions for High Tensile Steel Wire Not Covered by Insul-Tube®
Start at the bottom of the post, wrap the wire, and attach it securely to the post with staples approximately 16 to 18 inches off the ground, making sure to leave no sharp edges protruding that may injure animal or human. Take the wire up to the top of the other brace post and secure it with a staple, leaving enough room so that the wire can run freely through the staple. Now take the wire back to the bottom of post where you started, approximately 16 to 17 inches off ground; pull as tight as possible and cut the wire, leaving enough securely attached to the post. Again, make sure there are no sharp edges.
At the bottom of the post (letter A on the diagram), insert a large screwdriver or bar, low to the ground, and twist the two wires together to the desired tension. Remove the screwdriver or bar and cover the wire with plastic pipe or tubing for additional safety, if desired. Twitch sticks can be chewed by horses and halters can catch in them, so use at your own risk. If you have long spans of fence line go to double brace assemblies.
Directions for Single Diagonal High Tensile Steel Wire Brace Covered with Insul-Tube®
Wrap the end of the high tensile steel wire at the corner or end post about 16 to 18 inches above the ground, and secure it with a staple. Then drill a hole for a wire vice (size 5058) about six inches below the top of the post. Cut the wire to length, cover it with Insul tube, and pass the wire through the drilled hole into a wire vice. Push the wire vice into the hole and tension up. No twisting with a screwdriver or bar is required when using this method.
Now that the posts are well into the ground and the braces are correctly assembled, your fence is ready for fabrication.
Related: How to Make Rotational Grazing Work on Your Horse Farm
Related: TLC for Horse Barns and Properties
Since 1985, Ferris Fencing has specialized in equine, general farm, horticulture, and vineyard applications, complete electric systems, and electric nets. As farmers, horse owners, and engineers, they are experts in the technical aspects of installation and application of fencing systems. For more information, visit Ferris Fencing Inc.
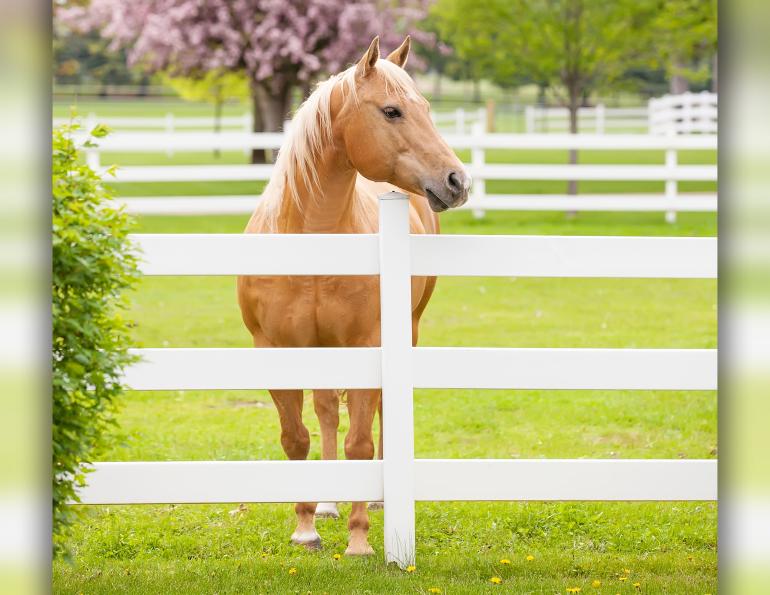
Main photo: The right fence posts, correctly installed, will require less maintenance, increase your property value, and protect your horses and other livestock from harm. Credit: iStock/Emholk
This article was originally published in 2010.
Blogs & Podcasts

Advertisement

Related Articles


Advertisement

Featured Stories


Advertisement
